Thứ Ba, 3 tháng 6, 2014

How to install dns server in centos 6 - DNS

How to install dns server in centos 6 - DNS

DNS helps to resolve domain name to ip address and ip address to domain name . In this post we can see how to configure DNS server on centos 6.

Install dns server in centos 6 :

Just follow the step by step instruction to setup dns server on centos 6 .
You can also refer the below posts for Centos OS installation and network configuration
» Centos 6 installation step by step screenshots
» How to setup network in centos 6
Step 1 » Install bind packages by issuing the below command.
[root@localhost ~]# yum install bind*

Step 2 » Assign static IP address.
[root@localhost ~]# vim /etc/sysconfig/network-scripts/ifcfg-eth0
Step 3 » Assign fully qualified domain name for the server ( Ex: dns1.krizna.com )
[root@localhost ~]# vim /etc/sysconfig/network
Step 4 » Add a host entry in the host file .
[root@localhost ~]# vim /etc/hosts
Step 5 » Add server ip to the resolve.conf file.
[root@localhost ~]# vim /etc/resolv.conf
Just We completed pre requirements for DNS server . Lets start main configuration
Step 6 » Open /etc/named.conf file and Edit the following line Nos 11,12 and 17 like below
[root@localhost ~]# vim /etc/named.conf

Step 6 » Now open /etc/named.rfc1912.zones file and edit the following line nos 13,14,31 and 32
[root@localhost ~]# vim /etc/named.rfc1912.zones
Step 7 » Now create forward and reverse zone files like below
[root@localhost ~]# cp /var/named/named.localhost /var/named/forward.zone
[root@localhost ~]# cp /var/named/named.loopback /var/named/reverse.zone

Step 8 » Open the forward zone file and replace with your hostname like below
[root@localhost ~]# vim /var/named/forward.zone
Step 9 » Now open the reverse zone file and replace like below .
[root@localhost ~]# vim /var/named/reverse.zone
Step 10 » Now set group permissions for the files

[root@localhost ~]# chgrp named /var/named/forward.zone
[root@localhost ~]# chgrp named /var/named/reverse.zone

Step 11 » That’s it , now start the service by typing the below command
Step 12 » Issue the below command to start service on bootup and Reboot the server
[root@localhost ~]# chkconfig --levels 235 named on
Step 13 » After rebooting .Just issue the below commands to test your dns server
[root@dns1 ~]# dig
All the best

source : http://www.krizna.com/centos/how-to-install-dns-server-in-centos-6/

How to setup mail server in centos 6(postfix-dovecot)

How to setup mail server in centos 6(postfix-dovecot)

This article describes how to setup a mail server in centos 6 . Here i have used three popular packages which is very easy to configure .
» Postfix ( for sending )
» Dovecot ( for receiving )
» Squirrelmail ( for webmail access )
This guide is strictly for learning purpose , not for real time servers .
Let’s start

Setup mail server in centos 6

» Installing and configuring  postfix
» Installing and configuring  dovecot
» Creating users and testing
» Installing and configuring squirrelmail

» Installing and configuring  postfix

Step 1 »Before installation assign a static ip and add a host entry for your domain to that IP in the /etc/hosts file like below.
192.168.0.15 krizna.com
Step 2 » Issue the below command to install postfix
[root@mail ~]# yum -y install postfix
Step 3 » Now issue the below command to install SMTP AUTH packages .
[root@mail ~]# yum -y install cyrus-sasl cyrus-sasl-devel cyrus-sasl-gssapi cyrus-sasl-md5 cyrus-sasl-plain
Postfix package installation is completed .
Step 4 » Issue the below commands one by one for creating SSL Cert.
[root@mail ~]# mkdir /etc/postfix/ssl
[root@mail ~]# cd /etc/postfix/ssl/
[root@mail ssl]# openssl genrsa -des3 -rand /etc/hosts -out smtpd.key 1024
[root@mail ssl]# chmod 600 smtpd.key
[root@mail ssl]# openssl req -new -key smtpd.key -out smtpd.csr
[root@mail ssl]# openssl x509 -req -days 365 -in smtpd.csr -signkey smtpd.key -out smtpd.crt
[root@mail ssl]# openssl rsa -in smtpd.key -out smtpd.key.unencrypted
[root@mail ssl]# mv -f smtpd.key.unencrypted smtpd.key
[root@mail ssl]# openssl req -new -x509 -extensions v3_ca -keyout cakey.pem -out cacert.pem -days 365

Step 4 » Now open /etc/postfix/main.cf file .
Find and comment the below lines .
#inet_interfaces = localhost #---> line no 116
#mydestination = $myhostname, localhost.$mydomain, localhost #--> line no 164

and add these lines at the bottom of the file.
Step 5 » Now open /etc/postfix/master.cf file and add the below line after smtp
Step 6 » Now start postfix and saslauthd service
[root@mail ~]# service postfix start
[root@mail ~]# service saslauthd start
» Issue the below commands to start the postfix and saslauthd at startup
[root@mail ~]# chkconfig --level 235 postfix on
[root@mail ~]# chkconfig --level 235 saslauthd on
Step 7 » Now check your smtp connectivity . just telnet localhost on port 25 and type this command ehlo localhost
[root@mail ~]# telnet localhost 25
Trying ::1...
Connected to localhost.
Escape character is '^]'.
220 mail.krizna.com ESMTP Postfix
ehlo localhost <---- type this command
250-mail.krizna.com
250-PIPELINING
250-SIZE 10240000
250-VRFY
250-ETRN
250-STARTTLS
250-AUTH PLAIN LOGIN
250-AUTH=PLAIN LOGIN
250-ENHANCEDSTATUSCODES
250-8BITMIME
250 DSN
quit
221 2.0.0 Bye
Connection closed by foreign host.

If you get this output .. Great .. everything is fine till now.

» Installing and configuring dovecot

Step 8 » Issue this command to install dovecot
[root@mail ~]# yum -y install dovecot
Step 9 » After installation open /etc/dovecot/dovecot.conf file and add the below line at the end of the file. please make sure mail_location and home_mailbox in postfix configuration are using the same name.
protocols = imap pop3
mail_location = maildir:~/mail
pop3_uidl_format = %08Xu%08Xv

Step 10 » Now start dovecot service
[root@mail ~]# service dovecot start
» Issue the below command to start the dovecot at startup
[root@mail ~]# chkconfig --level 235 dovecot on
Step 11 » Now test your pop3 connectivity .
[root@mail ~]# telnet localhost 110
Trying ::1...
Connected to localhost.
Escape character is '^]'.
+OK Dovecot ready.
quit
+OK Logging out
Connection closed by foreign host.

Yes .. your server is ready to receive mails .

» Creating users and testing

Step 11 » Now create users to test your configuration.
[root@mail ~]# useradd -m bobby -s /sbin/nologin
[root@mail ~]# useradd -m leela -s /sbin/nologin
and create passwords for the users created
[root@mail ~]# passwd bobby
[root@mail ~]# passwd leela
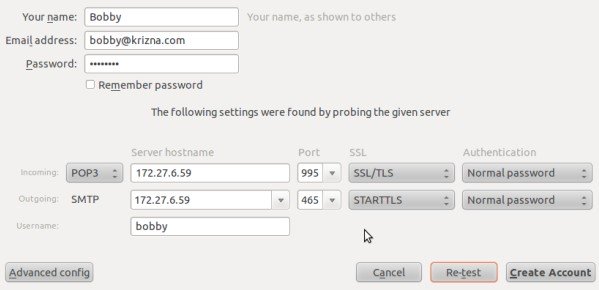
Step 12 » Test your configuration in thunderbird . Refer the below image for configuration details.
Mail server centos 6 testing
Step 13 » Now you can send and receive mails using this server. In case of any issues please check the log file /var/log/maillog )
your mail server is ready …

» Installing and configuring squirrelmail

Step 14 » you need to add EPEL repository to install squirrelmail package. you can find latest EPEL repository rpm here ( http://ftp.jaist.ac.jp/pub/Linux/Fedora/epel/6/i386/repoview/epel-release.html )
[root@mail ~]# rpm -ivh http://ftp.jaist.ac.jp/pub/Linux/Fedora/epel/6/i386/epel-release-6-8.noarch.rpm
Step 15 » Issue the below command to install squirrelmail.
[root@mail ~]# yum install squirrelmail
This command will install squirrelmail along with apache and php.
Step 16 » Now run the below command to configure squirrelmail .
[root@mail ~]# perl /usr/share/squirrelmail/config/conf.pl
»»» 1 »»» 1 »»» krizna (type Organization name ) »»» R ( return )
»»» 2 »»» 1 »»» ( hit space for empty Domain name ) and choose 3 »»» SMTP ( choose SMTP ) »»» R ( return )
»»» D »»» dovecot ( type ) »»» press enter with default
»»» s ( save and quit)
Step 17 » Open /etc/httpd/conf.d/squirrelmail.conf file and uncomment below lines
# RewriteCond %{HTTPS} !=on
# RewriteRule (.*) https://%{HTTP_HOST}%{REQUEST_URI}

Step 18 » start apache service
[root@mail ~]# service httpd start
» Issue the below commands to start the httpd at startup
[root@mail ~]# chkconfig --level 235 httpd on
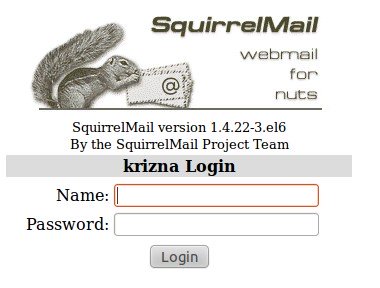
Step 19 » Now open http://serverip/webmail path in your browser . you could able to see the below page .
setup mail server postfix-dovecot-squirrelmail
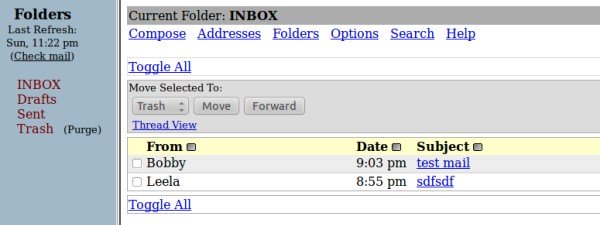
and after login
setup mail server postfix-dovecot-squirrelmail
If any issues with apache check this page Installing Apache2 , Mysql server and PHP on Centos 6 (LAMP)
Good luck
source: http://www.krizna.com/centos/setup-mail-server-in-centos-6/

Chủ Nhật, 1 tháng 6, 2014

How To Protect SSH with fail2ban on Ubuntu 12.04

How To Protect SSH with fail2ban on Ubuntu 12.04

TAGGED IN: LINUX BASICS, UBUNTU, SECURITY

About Fail2Ban


Servers do not exist in isolation, and those virtual private servers with only the most basic SSH configuration can be vulnerable to brute force attacks. fail2ban provides a way to automatically protect virtual servers from malicious behavior. The program works by scanning through log files and reacting to offending actions such as repeated failed login attempts. 

Step One—Install Fail2Ban


Use apt-get to install Fail2Ban
sudo apt-get install fail2ban

Step Two—Copy the Configuration File


The default fail2ban configuration file is location at /etc/fail2ban/jail.conf. The configuration work should not be done in that file, however, and we should instead make a local copy of it.
sudo cp /etc/fail2ban/jail.conf /etc/fail2ban/jail.local

After the file is copied, you can make all of your changes within the new jail.local file. Many of possible services that may need protection are in the file already. Each is located in its own section, configured and turned off.

Step Three—Configure the Defaults in Jail.Local


Open up the the new fail2ban configuration file:
sudo nano /etc/fail2ban/jail.local

The first section of defaults covers the basic rules that fail2ban will follow. If you want to set up more nuanced protection on your virtual server, you can customize the details in each section.

You can see the default section below.
[DEFAULT]

# "ignoreip" can be an IP address, a CIDR mask or a DNS host
ignoreip = 127.0.0.1/8
bantime  = 600
maxretry = 3

# "backend" specifies the backend used to get files modification. Available
# options are "gamin", "polling" and "auto".
# yoh: For some reason Debian shipped python-gamin didn't work as expected
#      This issue left ToDo, so polling is default backend for now
backend = auto

#
# Destination email address used solely for the interpolations in
# jail.{conf,local} configuration files.
destemail = root@localhost
Write your personal IP address into the ignoreip line. You can separate each address with a space. IgnoreIP allows you white list certain IP addresses and make sure that they are not locked out. Including your address will guarantee that you do not accidentally ban yourself from your own server.

The next step is to decide on a bantime, the number of seconds that a host would be blocked from the VPS if they are found to be in violation of any of the rules. This is especially useful in the case of bots, that once banned, will simply move on to the next target. The default is set for 10 minutes—you may raise this to an hour (or higher) if you like.

Maxretry is the amount of incorrect login attempts that a host may have before they get banned for the length of the ban time. 

You can leave the backend as auto.

Destemail is the email that alerts get sent to. If you have a mail server set up on your droplet, Fail2Ban can email you when it bans an IP address.

Additional Details—Actions

The Actions section is located below the defaults. The beginning looks like this:
#
# ACTIONS
#

# Default banning action (e.g. iptables, iptables-new,
# iptables-multiport, shorewall, etc) It is used to define
# action_* variables. Can be overridden globally or per
# section within jail.local file
banaction = iptables-multiport

# email action. Since 0.8.1 upstream fail2ban uses sendmail
# MTA for the mailing. Change mta configuration parameter to mail
# if you want to revert to conventional 'mail'.
mta = sendmail

# Default protocol
protocol = tcp
[...]

Banaction describes the steps that fail2ban will take to ban a matching IP address. This is a shorter version of the file extension where the config if is located. The default ban action, "iptables-multiport", can be found at /etc/fail2ban/action.d/iptables-multiport.conf 

MTA refers to email program that fail2ban will use to send emails to call attention to a malicious IP. 

You can change the protocol from TCP to UDP in this line as well, depending on which one you want fail2ban to monitor.

Step Four (Optional)—Configure the ssh-iptables Section in Jail.Local


The SSH details section is just a little further down in the config, and it is already set up and turned on. Although you should not be required to make to make any changes within this section, you can find the details about each line below.
[ssh]

enabled  = true
port     = ssh
filter   = sshd
logpath  = /var/log/auth.log
maxretry = 6

Enabled simply refers to the fact that SSH protection is on. You can turn it off with the word "false".

The port designates the port that fail2ban monitors. If you have set up your virtual private server on a non-standard port, change the port to match the one you are using:
 eg. port=30000

The filter, set by default to sshd, refers to the config file containing the rules that fail2ban uses to find matches. sshd refers to the /etc/fail2ban/filter.d/sshd.conf.

log path refers to the log location that fail2ban will track.

The max retry line within the SSH section has the same definition as the default option. However, if you have enabled multiple services and want to have specific values for each one, you can set the new max retry amount for SSH here.

Step Five—Restart Fail2Ban


After making any changes to the fail2ban config, always be sure to restart Fail2Ban:
sudo service fail2ban restart

You can see the rules that fail2ban puts in effect within the IP table:
sudo iptables -L
By Etel Sverdlov
https://www.digitalocean.com/community/articles/how-to-protect-ssh-with-fail2ban-on-ubuntu-12-04

Bonding or Teaming for redhat Server


Bonding or Teaming for redhat Server

Type : System
Operating System
: Redhat,Fedora,Centos
This Howto explain how to install the Bonding or the Teaming solution on a RedHat distribution. One of the goal of the teaming and bonding solution is to use all networks interfaces for backup or round robin solution.
The bonding need to work with a minimum of 2 NIC to have real goal.
The concept of NIC Bonding (or sometimes called NIC Teaming) is that you have two NICs bonded together to create only one physical device.

Bonding schema and switch topology :

|                                            |
|port3                                  port3|
+-----+----+                                 +-----+-----+
|          |port2                      port2 |           |
| switch A +---------------------------------+ switch B  |
|          |                                 |           |
+-----+----+                                 +-----+-----+
|port1                                  port1|
|                 +-------+                  |
+-----------------+ host1 +------------------+
eth0 +-------+ eth1


Before attempting to bond two NICs, i recommended to verify the integrity and functionality of each NIC. Please check your interface status with ethtool:
#ethtool eth0
Settings for eth0:
Supported ports: [ TP MII ]
Supported link modes: 10baseT/Half 10baseT/Full
100baseT/Half 100baseT/Full
Supports auto-negotiation: Yes
Advertised link modes: 10baseT/Half 10baseT/Full
100baseT/Half 100baseT/Full
Advertised auto-negotiation: Yes
Speed: 100Mb/s
Duplex: Full Port: MII
PHYAD: 1
Transceiver: internal
Auto-negotiation: on
Supports Wake-on: g
Wake-on: g
Current message level: 0x00000007 (7)
Link detected: yes
#ethtool eth1
Settings for eth1:
Supported ports: [ TP MII ]
Supported link modes: 10baseT/Half 10baseT/Full
100baseT/Half 100baseT/Full
Supports auto-negotiation: Yes
Advertised link modes: 10baseT/Half 10baseT/Full
100baseT/Half 100baseT/Full
Advertised auto-negotiation: Yes
Speed: 100Mb/s Duplex: Full Port: MII
PHYAD: 1
Transceiver: internal
Auto-negotiation: on
Supports Wake-on: g
Wake-on: g
Current message level: 0x00000007 (7)
Link detected: yes
Now the Interface seems to be good for the configuration, we have to ckeck if you have all kernel modules.
#modprobe --list | grep bonding
/lib/modules/2.6.*/kernel/drivers/net/bonding/bonding.ko
#modprobe --list | grep mii
/lib/modules/2.6.*/kernel/drivers/net/mii.ko
Your server seems to be ready fot the configuration of the module for a backup connection:
#vi /etc/modprobe.conf
alias bond0 bonding
options bond0 miimon=80 mode=1
To have more information about the bonding module you have to do this command line.
In bold font you have the main status for the bonding function.
#modinfo bonding
author: Thomas Davis, tadavis@lbl.gov and many others
description: Ethernet Channel Bonding Driver, v3.1.2
version: 3.1.2
license: GPL
srcversion: 6CD19765D6431C07199456E
depends:
vermagic: 2.6.18-53.1.4.el5xen SMP mod_unload gcc-4.1
parm: max_bonds:Max number of bonded devices (int)
parm: miimon:Link check interval in milliseconds (int)
parm: updelay:Delay before considering link up, in milliseconds (int)
parm: downdelay:Delay before considering link down, in milliseconds (int)
parm: use_carrier:Use netif_carrier_ok (vs MII ioctls) in miimon; 0 for off, 1 for on (default) (int)
parm: mode:Mode of operation : 0 for balance-rr, 1 for active-backup, 2 for balance-xor, 3 for broadcast, 4 for 802.3ad, 5 for balance-tlb, 6 for balance-alb (charp)
parm: primary:Primary network device to use (charp)
parm: lacp_rate:LACPDU tx rate to request from 802.3ad partner (slow/fast) (charp)
parm: xmit_hash_policy:XOR hashing method: 0 for layer 2 (default), 1 for layer 3+4 (charp)
parm: arp_interval:arp interval in milliseconds (int)
parm: arp_ip_target:arp targets in n.n.n.n form (array of charp)
parm: arp_validate:validate src/dst of ARP probes: none (default), active, backup or all (charp)
module_sig: 883f350474fb1b5bf23bf4d191725311298f009e2cbe4ce27b13fd747fc988615153453d50a29aff0a08158d98a7570129eb3197be02aebeaf52d9aebe
miimon is use for the monitoring of each ethX each 80 milliseconds, but you can use also a arp_ip_target like this other configuration for this module.
#vi /etc/modprobe.conf
alias bond0 bonding
options bond0 mode=1 arp_ip_target=192.168.1.1 arp_interval=200 primary=eth0
This configuration use arp resquest on the primary interface each 200ms
Now the kernel module is configure and we have to load thoses modules :
#modprobe bonding
#modprobe mii
All modules are loaded and ready for the configuration of each NIC
Configuration of eth0:
#vi /etc/sysconfig/network-script/ifcfg-eth0
DEVICE=eth0
BOOTPROTO=none
ONBOOT=yes
MASTER=bond0
SLAVE=yes
USERCTL=no
Configuration of eth1
#vi /etc/sysconfig/network-script/ifcfg-eth1
DEVICE=eth1
BOOTPROTO=none
ONBOOT=yes
MASTER=bond0
SLAVE=yes
USERCTL=no
Configuration of bond0
#vi /etc/sysconfig/network-script/ifcfg-bond0
DEVICE=bond0
BOOTPROTO=none
ONBOOT=yes
NETMASK=255.255.255.0
IPADDR=192.168.1.5
USERCTL=no
Now to finish the installation we have to applied the network parameters.
#/etc/init.d/network restart
Your bonding is now operational.
We have to test the bonding interface :
# cat /proc/net/bonding/bond0
Ethernet Channel Bonding Driver: v3.1.2 (January 20, 2007)
Bonding Mode: fault-tolerance (active-backup)
Primary Slave: None
Currently Active Slave: eth0
MII Status: up
MII Polling Interval (ms): 80
Up Delay (ms): 0
Down Delay (ms): 0
Slave Interface: eth0
MII Status: up
Link Failure Count: 0
Permanent HW addr: 00:XX:XX:XX:XX:c2
Slave Interface: eth1
MII Status: up
Link Failure Count: 0
Permanent HW addr: 00:XX:XX:XX:XX:c4

source:  http://www.generationip.com/documentation/system-documentation/65-bonding-or-teaming-for-redhat-server

Configure Virtual Chassis on Juniper EX4200 EX4500 EX4550 Switches

Configure Virtual Chassis on Juniper EX4200 EX4500 EX4550 Switches

Howto configure Virtual Chassis on Juniper EX4200 EX4500 EX4550 Switches


1. Preprovisioned Configuration
Step 1: Prepare the list for Serial number of the switches and choose which switch will be routing-engine (2 switches one master and one backup) or line-card role (others).
Step 2: Start Switch which you want it is master
Step 3: Run EZSetup
Step 4: Set preprovisioning configuration mode
 [edit virtual-chassis]
root@switch# set preprovisioned
Step 5: Set routing-engine role for members (master and backup)
root@switch# set virtual-chassis member 0 serial-number F8JDJJDD898 role routing-engine
root@switch# set virtual-chassis member 1 serial-number F8JDJJDD387 role routing-engine
Step 6: Connect Virtual Chassis to the switches and others switches will be line-card role.
2. Non provisioned
Step 1: Choose master role by priority on switches which we want them to be routing-engine role.
2 switches will be routing-engine roles and one is master and one is backup
[edit virtual-chassis]
root@switch# set member 0 mastership-priority 255
[edit virtual-chassis]
root@switch# set member 0 mastership-priority 255
Step 2: Connect others switch to Virtual chassis. By default, priority on switches are 128.
3.  Show virtual chassis status
root@switch> show virtual-chassis
That’s all. Thanks for using IThelpblog.com.

 source :http://ithelpblog.com/network/juniper/howto-configure-virtual-chassis-on-juniper-ex4200-ex4500-ex4550-switches/