Thứ Tư, 8 tháng 10, 2014

Auto switch Gateway on Centos

I have Centos server, how to auto check status connect Internet any times ? , if it lost connect to ISP 1 then it auto connect to ISP 2 and reverse.
I created script to auto check  and switch ISP for this problem:


root@wgproxy [~] # mkdir /root/ChangeGW

root@wgproxy [~] # cd /root/ChangeGW/

root@wgproxy [~/ChangeGW] # vi checkGW.py
#!/usr/bin/python
import os, smtplib
from threading import Thread

def sendmail(subject):
        "Sends an email to the specified recipent "
        username = '
xxxxx@gmail.com'
        password = 'abcdefgh'

        server = smtplib.SMTP('smtp.gmail.com:25')
        server.starttls()
        server.login(username, password)

        fromAddr ='xxxxx@gmail.com'
        toAddr2 = 'yyyyyy@gmail.com'
        header = 'To: ' + toAddr2 + '\n' + 'From: ' + fromAddr  + '\n' + 'Subject: ' + subject + '\n'
  
        msg = header + '\nCheck it now!\n'

    server.sendmail(fromAddr, toAddr2, msg)
        server.close()
def FPT():
        ip = '/root/ChangeGW/ISP'
    ret = os.system('ping -c 4 118.70.127.130 &> /dev/null')
        fr = open(ip,"r")
        str = fr.read(3)
        fr.close()
    if ret != 0 and str == "FPT":
                message = 'ADSL FPT has been DOWN and switch to ADSL VT'
                os.system('/root/ChangeGW/GWVT')
        fo1 = open(ip,"w")
                fo1.write("VTL")
                fo1.close()
                sendmail(message)
                print message

def VT():
        ip = '/root/ChangeGW/ISP'
    ret = os.system('ping -c 4 118.70.127.130 &> /dev/null')
        fr = open(ip,"r")
        str = fr.read(3)
        fr.close()
    if ret == 0 and str == "VTL":
                message = 'ADSL FPT has been Up and Restored ADSL VT to ADSL FPT'
                os.system('/root/ChangeGW/GWFPT')
        fo1 = open(ip,"w")
                fo1.write("FPT")
                fo1.close()
                sendmail(message)
                print message
def checkGW():     
    FPT()
    VT()
t = Thread(target=checkGW)
t.start()


root@wgproxy [~/ChangeGW] # vi GWFPT

#!/bin/bash
echo NETWORKING=yes > /etc/sysconfig/network
echo HOSTNAME=wgproxy >> /etc/sysconfig/network
echo GATEWAY=192.168.1.2 >> /etc/sysconfig/network
echo NOZEROCONF=yes >> /etc/sysconfig/network
/sbin/service network restart
root@wgproxy [~/ChangeGW] # vi GWVT

#!/bin/bash
echo NETWORKING=yes > /etc/sysconfig/network
echo HOSTNAME=wgproxy >> /etc/sysconfig/network
echo GATEWAY=192.168.10.1 >> /etc/sysconfig/network
echo NOZEROCONF=yes >> /etc/sysconfig/network
/sbin/service network restart


root@wgproxy [~/ChangeGW] # vi ISP

FPT #begin set content FPT, default using FPT network

root@wgproxy [~/ChangeGW] # chmod +x checkGW.py

root@wgproxy [~/ChangeGW] # chmod +x GWFPT

root@wgproxy [~/ChangeGW] # chmod +x GWVT

insert crontab run after about 1 minute:  
 * * * * * /root/ChangeGW/checkGW.py > /dev/null 2>&1 
# run 1 minute

OK Done, let's go test it 

Thứ Ba, 7 tháng 10, 2014

How-To configure a DHCP Server running on multiple network interfaces

This post will explain how to configure a DHCP Server running on Ubuntu Server 9.04 (Jaunty Jackalope) for more than one interfaces and more than one network.
This post assume you have :
– A private network with 192.168.123.0/24
Three network on which you have to assign dinamic IP Addresses, for example a LAB network, an SUP Network (Support) and a WIFI network with the following subnet.
– 192.168.124.0/24 (sup)
– 192.168.125.0/24 (lab)
– 192.168.127.0/24 (wifi)
This post also assume you have a system running ubuntu (or debian) with four (4) NIC each one connected to one of the network above, and you will have the following configuration :
SUP network
Server IP Address : 192.168.124.1
DHCP Scope : 192.168.124.100 – 192.168.124.200
Gateway : 192.168.124.254
LAB network
Server IP Address : 192.168.125.1
DHCP Scope : 192.168.125.100 – 192.168.125.200
Gateway : 192.168.125.254
WIFI network
Server IP Address : 192.168.127.1
DHCP Scope : 192.168.127.100 – 192.168.127.200
Gateway : 192.168.127.254
The name server for all the networks will be a server in the internal network (192.168.123.2).
First of all you have to install DHCP server, for doing so, type :
sudo apt-get install dhcp3-server
After this you have to check your network interfaces configuration by editing the /etc/network/interfaces as the following.
Note that eth0 on the internal network is configured for obtaining a dinamic ip address from another DHCP server, but if you want you should assign to it a static ip address.
# The primary network interface
auto eth0
iface eth0 inet dhcp
# The SUP network interface
auto eth1
iface eth1 inet static
address 192.168.124.1
netmask 255.255.255.0
network 192.168.124.0
broadcast 192.168.124.255
# The LAB network interface
auto eth2
iface eth2 inet static
address 192.168.125.1
netmask 255.255.255.0
network 192.168.125.0
broadcast 192.168.125.255
# The WIFI network interface
auto eth3
iface eth3 inet static
address 192.168.127.1
netmask 255.255.255.0
network 192.168.127.0
broadcast 192.168.127.255
Now you have to declare on which interfaces the DHCP server will listen for DHCP request, default is eth0 only.
You can do it by editing /etc/default/dhcp3-server as follow :
INTERFACES=”eth1 eth2 eth3″
At this point you have “only” to configure your DHCP Scope to assign IP on all networks by editing /etc/dhcp3/dhcpd.conf as following :
ddns-update-style none;
default-lease-time 600;
max-lease-time 7200;
authoritative;
log-facility local7;
# Avoid to serve anythings on INTERNAL network
subnet 192.168.123.0 netmask 255.255.255.0 {
}
# The SUP network scope
subnet 192.168.124.0 netmask 255.255.255.0 {
range 192.168.124.100 192.168.124.200;
option routers                  192.168.124.254;
option subnet-mask              255.255.255.0;
option broadcast-address        192.168.124.255;
option domain-name-servers      194.168.123.2;
option domain-name              “damatc.local”;
option ntp-servers              194.168.123.2;
option netbios-name-servers     194.168.123.2;
option netbios-node-type 2;
default-lease-time 86400;
max-lease-time 86400;
}
# The LAB network scope
subnet 192.168.125.0 netmask 255.255.255.0 {
range 192.168.125.100 192.168.125.200;
option routers                  192.168.125.254;
option subnet-mask              255.255.255.0;
option broadcast-address        192.168.125.255;
option domain-name-servers      194.168.123.2;
option domain-name              “damlab.local”;
option ntp-servers              194.168.123.2;
option netbios-name-servers     194.168.123.2;
option netbios-node-type 2;
default-lease-time 86400;
max-lease-time 86400;
}
# The WIFI network scope
subnet 192.168.127.0 netmask 255.255.255.0 {
range 192.168.127.100 192.168.127.200;
option routers                  192.168.127.254;
option subnet-mask              255.255.255.0;
option broadcast-address        192.168.127.255;
option domain-name-servers      194.168.123.2;
option domain-name              “damwifi.local”;
option ntp-servers              194.168.123.2;
option netbios-name-servers     194.168.123.2;
option netbios-node-type 2;
default-lease-time 86400;
max-lease-time 86400;
}
Hope this help
Bye
Riccardo
source: http://www.riccardoriva.info/blog/?p=693

Configuring DHCP Server on CentOS/RHEL 6

DHCP ( Dynamic Host Configuration Protocol ) is a network protocol used for assigning IP address to network clients dynamically from predefined IP pool. It is useful for LAN network, but not generally used for production servers. This article will help you for Configuring DHCP Server on CentOS, Red Hat System. Read more about dhcp here.
dhcp

Step 1: Install DHCP Package

First install dhcp packages using package manager yum on CentOS, Redhat system.
# yum install dhcp

Step 2: Edit /etc/sysconfig/dhcpd file

Firstly we need to set ethernet interface name as DHCPDARGS in /etc/sysconfig/dhcpd file. Edit this configuration file and update the ethernet name.
DHCPDARGS=eth1

Step 3: Configuring DHCP

DHCP creates an empty configuration file /etc/dhcp/dhcpd.conf. Also it provides a sample configuration file at /usr/share/doc/dhcp*/dhcpd.conf.sample, which is very useful for configuring the DHCP server.
So as a first part, copy content of sample configuration file to main configuration file. Sample configuration file may be changed as per version you have installed on your system.
# cp /usr/share/doc/dhcp-4.1.1/dhcpd.conf.sample /etc/dhcp/dhcpd.conf

3.1 – Parameter Configuration

First configure the basic options which is common to all supported networks.
  option domain-name "tecadmin.net";
  option domain-name-servers ns1.tecadmin.net, ns2.tecadmin.net;
  default-lease-time 600;
  max-lease-time 7200;
  authoritative;
  log-facility local7;

3.2 – IP Subnet Declaration

First edit dhcp configuration file and update subnet details as per your network. For this example we are configuring DHCP for 192.168.1.0/24 LAN network.
subnet 192.168.1.0 netmask 255.255.255.0 {
        option routers                  192.168.1.254;
        option subnet-mask              255.255.255.0;
        option domain-search            "tecadmin.net";
        option domain-name-servers      192.168.1.1;
        option time-offset              -18000;     # Eastern Standard Time
 range   192.168.1.10   192.168.1.100;
}

3.3 -Assign Static IP Address to Host

In some cases we need to assign a fixed ip to an interface each time it requested from dhcp. We can also assign a fixed ip on basis of MAC address (hardware ethernet) of that interface. Setup host-name is optional to set up.
host station1 {
   option host-name "station1.example.com";
   hardware ethernet 00:11:1A:2B:3C:AB;
   fixed-address 192.168.1.100;
}

Step 4: Restart DHCP

After making all above changes, lets start dhcp service using following command.
# service dhcp start
Similarly to stop and restart dhcp service use following commands.
# service dhcp stop
# service dhcp restart

Step 5: Setup Client System

At this stage we have a running dhcp server which is ready for accepting requests and assign them a proper ip. but to verify I have another CentOS machine running on same LAN. Now login to that client machine and edit ethernet configuration file.
# vim /etc/sysconfig/network-scripts/ifcfg-eth1

DEVICE=eth1
BOOTPROTO=dhcp
TYPE=Ethernet
ONBOOT=yes
Make sure BOOTPROTO is set to dhcp.
Let’s restart network services on client system. You will get that dhcp server assigned an ip address from defined subnet. If you have connected to client pc from remote login, Your session can be disconnect.
# service network restart

Thứ Năm, 2 tháng 10, 2014

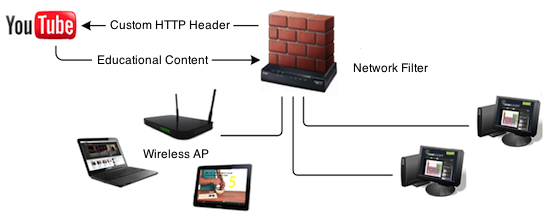
Filter YouTube with YouTube For Schools and squidGuard

Filter YouTube with YouTube For Schools and squidGuard


Before we start

Your LAN must already run a production instance of squid running on a Linux operating system such as Ubuntu.
For this guide, I was using Ubuntu Server 12.04 LTS which ships with squid/3.1.19. The guide has been tested on both 32 & 64 bit builds.

Ensure the following top-level domains are not blocked

youtube.com
ytimg.com

Sign up for a YouTube for school account

Go to http://www.youtube.com/account_school and sign up for a YouTube For school Account. The sign up process should only take minutes.
Once you account is created go to http://www.youtube.com/account_school and under the Instrucations heading, Step 1, search for the following string X-YouTube-Edu-Filter: the random numbers and letters after that string are your account ID. The account ID is required for the redirection to work correctly. Please document your account ID.
ABCD1234567890abcdef

Install squidGuard

squidGuard is the URL rewrite program. To install use the following command
proxy:~$ sudo apt-get install squidguard

Edit squidGuard configuration

Lets backup the default squidGuard configuration as it has examples which as useful but none of which we require.
proxy:~$ sudo cp -v /etc/squid/squidGuard.conf /etc/squid/squidGuard.conf.original
So time to edit the squidGuard configuration and make it work for you.
proxy:~$ sudo vim /etc/squid/squidGuard.conf
Remove all the examples and paste in the new configuration from below. Please replace ABCD1234567890abcdef with your YouTube for Schools Account ID. Save and exit
#
# CONFIG FILE FOR SQUIDGUARD
#
# Caution: do NOT use comments inside { }
#
dbhome /var/lib/squidguard/db
logdir /var/log/squid
# ACL RULES:
#
rew youtube {
 s@(http://www.youtube.com/watch\?v=.*)@\1\&edufilter=ABCD1234567890abcdef@i
}
acl {
 default {
 pass any
 rewrite youtube
 }
}

Add squidGuard into your squid configuration

proxy:~$ sudo vim /etc/squid3/squid.conf
Search for url_rewrite_program and insert the following line. Save and exit.
url_rewrite_program /usr/bin/squidGuard -c /etc/squid/squidGuard.conf

Restart squid to enable squidGuard

To enable the config changes to the squid service.
proxy:~$ sudo service squid3 restart

YouTube for schools in now enabled

When you load http://www.youtube.com you be able to see all videos listed on the main page but when you attempt to watch these videos you will only be able to view content classified as educational by youtube or content that the has been added to the schools youtube account’s playlists.

While you can add staff into a list of teachers that can view all content, only the administrator (schools youtube account) can add content to be viewed by all students.
You may want to block access to youtube.com via HTTPS as squidGuard rewrite is unable to intercept SSL connections.

References

http://www.youtube.com/account_school
http://support.google.com/youtube/bin/static.py?hl=en&page=guide.cs&guide=2592683&topic=2592688
http://support.google.com/youtube/bin/static.py?hl=en&guide=2592683&topic=2592688&page=guide.cs&answer=2695317
http://squidguard.shalla.de/config/#Rewritegroups
https://help.ubuntu.com/community/SquidGuard

Source : http://www.cloudportal.org/2012/10/30/filter-youtube-with-youtube-for-schools-and-squidguard/